Table of content:
- I. Host setup
- II. Setup elasticluster
- II.1. Install elasticluster
- II.2. Check the elasticluster
- II.3. Elasticluster config file
- II.4. Set the subscription_id
- III. EvoRepo Cluster
- III.1. Create the cluster
- III.2. Setup the cluster
- III.3. Destroy the cluster
- III.4. Connect to cluster
I. Host setup
Operating system: Ubuntu Server 14.04.02
I.1. Upgrade OS
~ $ sudo apt-get -y update &> /dev/null
~ $ sudo apt-get -y upgrade &> /dev/null
~ $ sudo apt-get -y dist-upgrade &> /dev/null
I.2. Install requirements
~ $ sudo apt-get install -y build-essential python-dev git &> /dev/null
~ $ sudo apt-get install -y libssl-dev libffi-dev &> /dev/null
~ $ sudo apt-get install -y nodejs-legacy &> /dev/null
~ $ sudo apt-get install -y npm &> /dev/null
~ $ sudo apt-get install -y libxml2-dev libxslt1-dev &> /dev/null
~ $ wget https://bootstrap.pypa.io/get-pip.py -O get-pip.py &> /dev/null
~ $ sudo python get-pip.py &> /dev/null
I.3. Create .ssh directory
~ $ mkdir .ssh
~ $ chmod 700 .ssh/
I.4. Generate management certificate
~ $ cd ~/.ssh/
~ $ openssl req -x509 -nodes -days 365 -newkey rsa:2048 \
    -keyout managementCert.pem -out managementCert.pem
In order to create the certificate file it will require to provide some information regarding our organization. An example can be the following:
Generating a 2048 bit RSA private key
....+++
.+++
writing new private key to 'managementCert.pem'
-----
You are about to be asked to enter information that will be incorporated
into your certificate request.
What you are about to enter is what is called a Distinguished Name or a DN.
There are quite a few fields but you can leave some blank
For some fields there will be a default value,
If you enter '.', the field will be left blank.
-----
Country Name (2 letter code) [AU]:RO
State or Province Name (full name) [Some-State]:Romania
Locality Name (eg, city) []:Iași
Organization Name (eg, company) [Internet Widgits Pty Ltd]:Cloudbase Solutions
Organizational Unit Name (eg, section) []:
Common Name (e.g. server FQDN or YOUR name) []:Alexandru Coman
Email Address []:acoman@cloudbasesolutions.com
Now we will generate the .cer file required for interaction with Windows Azure API.
~ $ openssl x509 -outform der -in managementCert.pem -out managementCert.cer &> /dev/null
I.5. Generate the private keys
~ $ cd ~/.ssh/
~ $ openssl rsa -in managementCert.pem -out managementCert.key &> /dev/null
I.6. Update .ssh files privileges
~ $ cd ~/.ssh/
~ $ chmod 600 managementCert.cer
~ $ chmod 600 managementCert.pem
~ $ chmod 600 managementCert.key
~ $ ls -lah
total 20K
drwx------ 2 alex alex 4.0K Nov 16 22:22 .
drwxr-xr-x 4 alex alex 4.0K Nov 16 22:19 ..
-rw------- 1 alex alex  989 Nov 16 22:22 managementCert.cer
-rw------- 1 alex alex 1.7K Nov 16 22:22 managementCert.key
-rw------- 1 alex alex 3.1K Nov 16 22:22 managementCert.pem
I.7. Uploading managementCert.cer file to Windows Azure
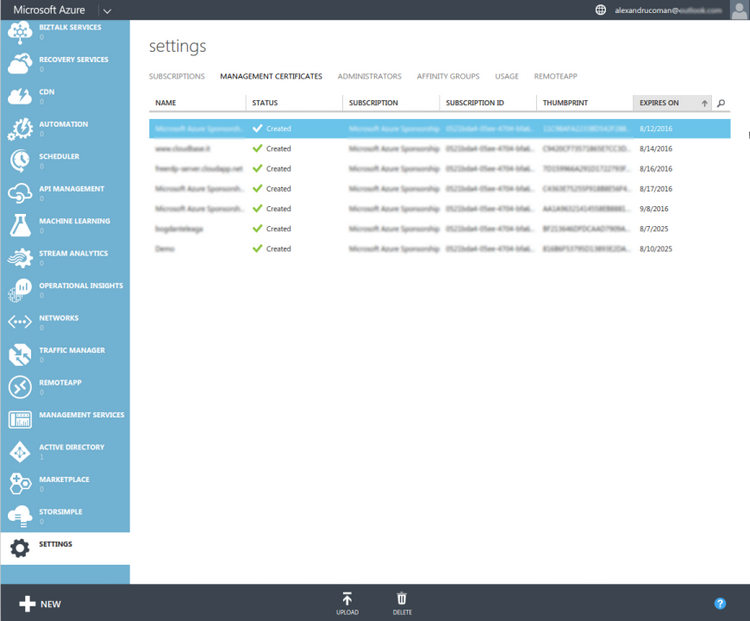
Once you have the managementCert.cer file which contains the public key, you need to upload it to the Windows Azure Management Portal. Open a browser and go to the portal: manage.windowsazure.com. Once you sign in, select the Settings tab on the far bottom of the left side of the portal, then click on Management Certificates.

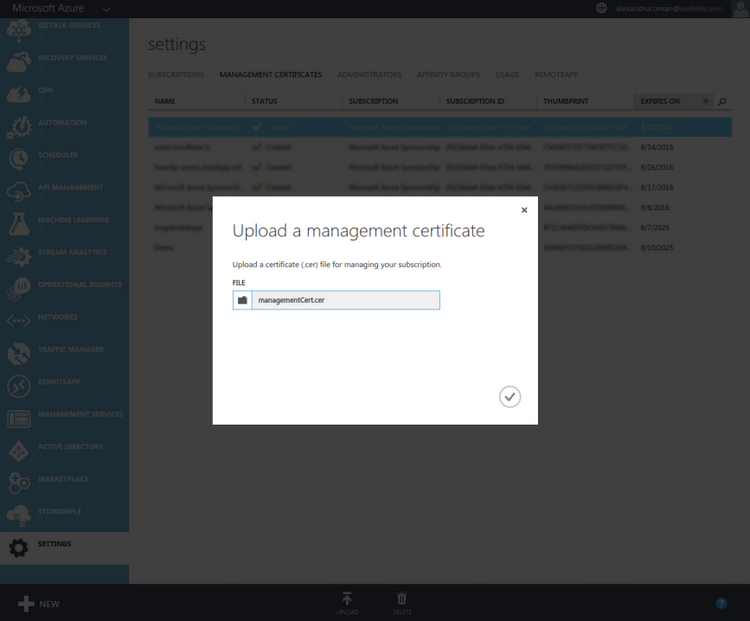
On the Management Certificates page, you can select the Upload action from the command bar at the bottom of the screen. It will prompt you for the .cer file you created which contains the public key for the certificate. Click on the little folder icon and locate the .cer file you created. If you have more than one subscription you may also see a drop-down with your subscriptions listed. If so, select the subscription you want to relate the certificate to. Finally, click the check mark to complete the upload.
 {: .center-image }
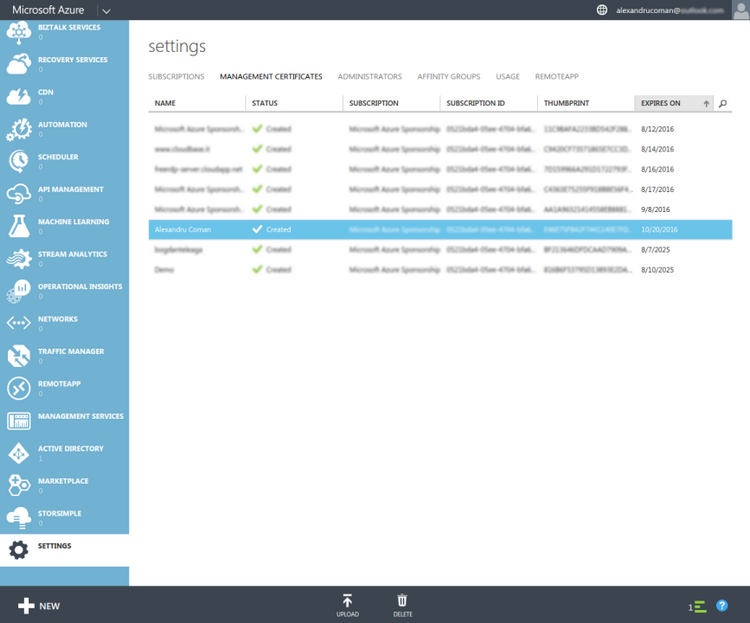
Within a few seconds the upload will complete and you will see the certificate in your list. If you wish to relate the same certificate to multiple subscriptions just repeat the steps above for each subscription. Note that relating the same certificate to multiple subscriptions is convenient, but somewhat like using the same password for multiple accounts. If someone gets a hold of the private portion of the certificate they would have access to all of the subscriptions.

II. Setup elasticluster
II.1. Install elasticluster
~ $ sudo pip install git+https://github.com/bobd00/elasticluster@master &> install.log
Truncated result:
~$ tail install.log
  Running setup.py install for PrettyTable
  Running setup.py install for simplejson
  Running setup.py install for uritemplate
  Running setup.py install for httplib2
  Running setup.py install for oauth2client
  Running setup.py install for python-gflags
  Running setup.py install for azure-elasticluster
Successfully installed Babel-2.1.1 MarkupSafe-0.23 PrettyTable-0.7.2 PyCLI-2.0.3 PyYAML-3.11 ansible-1.7.2 azure-1.0.2 azure-common-1.0.0 azure-elasticluster-1.1.dev0 azure-mgmt-0.20.1 azure-mgmt-common-0.20.0 azure-mgmt-compute-0.20.0 azure-mgmt-network-0.20.1 azure-mgmt-nspkg-1.0.0 azure-mgmt-resource-0.20.1 azure-mgmt-storage-0.20.0 azure-nspkg-1.0.0 azure-servicebus-0.20.1 azure-servicemanagement-legacy-0.20.1 azure-storage-0.20.2 boto-2.38.0 debtcollector-0.10.0 ecdsa-0.13 futures-3.0.3 google-api-python-client-1.4.2 httplib2-0.9.2 iso8601-0.1.11 jinja2-2.8 monotonic-0.4 msgpack-python-0.4.6 netaddr-0.7.18 netifaces-0.10.4 oauth2client-1.5.1 oslo.config-2.7.0 oslo.i18n-2.7.0 oslo.serialization-1.11.0 oslo.utils-2.8.0 paramiko-1.16.0 pbr-1.8.1 pyasn1-0.1.9 pyasn1-modules-0.0.8 pycrypto-2.6.1 python-dateutil-2.4.2 python-gflags-2.0 python-keystoneclient-1.8.1 python-novaclient-2.35.0 pytz-2015.7 requests-2.8.1 rsa-3.2.3 simplejson-3.8.1 six-1.10.0 stevedore-1.9.0 uritemplate-0.6 voluptuous-0.8.7 wrapt-1.10.5
/usr/local/lib/python2.7/dist-packages/pip/_vendor/requests/packages/urllib3/util/ssl_.py:90: InsecurePlatformWarning: A true SSLContext object is not available. This prevents urllib3 from configuring SSL appropriately and may cause certain SSL connections to fail. For more information, see https://urllib3.readthedocs.org/en/latest/security.html#insecureplatformwarning.
  InsecurePlatformWarning
The full log can be found here: install.log
Install azure-sdk-for-python v0.11.1
~ $ sudo pip install git+https://github.com/Azure/azure-sdk-for-python@v0.11.1
The output of the above command:
Collecting git+https://github.com/Azure/azure-sdk-for-python@v0.11.1
  Cloning https://github.com/Azure/azure-sdk-for-python (to v0.11.1) to /tmp/pip-WRpo2z-build
Requirement already satisfied (use --upgrade to upgrade): python-dateutil in /usr/local/lib/python2.7/dist-packages (from azure==0.11.1)
Requirement already satisfied (use --upgrade to upgrade): futures in /usr/local/lib/python2.7/dist-packages (from azure==0.11.1)
Requirement already satisfied (use --upgrade to upgrade): six>=1.5 in /usr/local/lib/python2.7/dist-packages (from python-dateutil->azure==0.11.1)
Installing collected packages: azure
  Found existing installation: azure 1.0.2
    Uninstalling azure-1.0.2:
      Successfully uninstalled azure-1.0.2
  Running setup.py install for azure
Successfully installed azure-0.11.1
II.2. Check the elasticluster
~$ elasticluster --help
usage: elasticluster [-h] [-v] [-s PATH] [-c PATH] [--version]

                     {list-nodes,migrate,stop,setup,list,gc3pie-config,sftp,list-templates,start,ssh,resize}
                     ...

Elasticluster will start, stop, grow, shrink clusters on an EC2 cloud.

optional arguments:
  -h, --help            show this help message and exit
  -v, --verbose         Increase verbosity. If at least four `-v` option are
                        given, elasticluster will create new VMs sequentially
                        instead of doing it in parallel.
  -s PATH, --storage PATH
                        Path to the storage folder. Default:
                        `/home/alex/.elasticluster/storage`
  -c PATH, --config PATH
                        Path to the configuration file. Default:
                        `/home/alex/.elasticluster/config`. If directory
                        PATH.d, also all files like PATH.d/*.conf are parsed.
  --version             Print version information and exit.

COMMANDS:
  {list-nodes,migrate,stop,setup,list,gc3pie-config,sftp,list-templates,start,ssh,resize}
                        Available commands. Run `elasticluster cmd --help` to
                        have information on command `cmd`.
    start               Create a cluster using the supplied configuration.
    stop                Stop a cluster and all associated VM instances.
    list                List all started clusters.
    list-nodes          Show information about the nodes in the cluster
    list-templates      Show the templates defined in the configuration file.
    setup               Configure the cluster.
    resize              Resize a cluster by adding or removing compute nodes.
    ssh                 Connect to the frontend of the cluster using the `ssh`
                        command
    sftp                Open an SFTP session to the cluster frontend host.
    gc3pie-config       Print a GC3Pie configuration snippet.
    migrate             Migrate a stored cluster
II.3. Elasticluster config file
$ ~ vim ~/.elasticluster/config
[cloud/azure-cloud]
provider = azure
subscription_id = [secret]
certificate = /home/alex/.ssh/managementCert.pem

[login/azure-login]
image_user = ubuntu
image_user_sudo = root
image_sudo = True
user_key_name = az_ec_key
user_key_private = /home/alex/.ssh/managementCert.key
user_key_public = /home/alex/.ssh/managementCert.pem

[setup/ansible]
provider = ansible
frontend_groups = common
compute_groups = clients

[setup/ansible-slurm]
provider = ansible
frontend_groups = slurm_master
compute_groups = slurm_clients
global_var_slurm_selecttype = select/cons_res
global_var_slurm_selecttypeparameters = CR_Core_Memory

[cluster/evorepo]
cloud = azure-cloud
login = azure-login
ssh_to = frontend
security_group = default
setup_provider = ansible
frontend_nodes = 1
compute_nodes = 1
image_id = b39f27a8b8c64d52b05eac6a62ebad85__Ubuntu-14_04-LTS-amd64-server-20140414-en-us-30GB
root_volume_size = 20
flavor = Small
location = East US
wait_timeout = 600
base_name = evorepo
global_var_ansible_ssh_host_key_dsa_public = ''

[cluster/evorepo/frontend]
flavor = Small
encrypted_volume_size = 20
encrypted_volume_type = io1
encrypted_volume_iops = 600
This config is based on azure-sample-config:
# Elasticluster Azure GridEngine Example

[cloud/azure-cloud]
provider=azure
subscription_id=****REPLACE WITH YOUR SUBSCRIPTION ID****
certificate=****REPLACE WITH YOUR MANAGEMENT CERT****

[login/azure-login]
image_user=azureuser
image_user_sudo=root
image_sudo=True
# keypair used to run stuff on the nodes.
user_key_name=az_ec_key
user_key_private=****REPLACE WITH PRIVATE KEY****
user_key_public=****REPLACE WITH PUBLIC KEY****

[setup/ansible-gridengine-azure]
provider=ansible
frontend_groups=gridengine_master
compute_groups=gridengine_clients

[cluster/azure-gridengine]
global_var_ansible_ssh_host_key_dsa_public=''
cloud=azure-cloud
login=azure-login
setup_provider=ansible-gridengine-azure
# other locations should work
location=East US
# one frontend node is normal for gridengine
frontend_nodes=1
# change this as needed
compute_nodes=2
ssh_to=frontend
# this is a very inexpensive image for testing. others should work too
image_id=b39f27a8b8c64d52b05eac6a62ebad85__Ubuntu-12_04_2-LTS-amd64-server-20121218-en-us-30GB
flavor=Small
security_group=default
# seconds allowed for all nodes to spin up:
wait_timeout=600

# azure resources will include this in their names.
# base_name should be between 3 and 15 characters, digits and lowercase letters only.
# note that some resources, such as storage accounts, must have names that are
# unique across all of Azure, so set base_name accordingly.
base_name=***REPLACE WITH BASE NAME****
II.4. Set the subscription_id
In order to get the subscription_id it will require to open a browser and go to the portal: manage.windowsazure.com. Once you sign in, select the Settings tab on the far bottom of the left side of the portal, then click on Subscriptions.
 {: .center-image }
~ $ vim ~/.elasticluster/config
And now edit the following line:
subscription_id = [secret]
with
# Change the xxx with the value from Windows Azure Portal
subscription_id = xxxxxxxx-xxxx-xxxx-xxxx-xxxxxxxxxxxx
III. EvoRepo Cluster
III.1. Create the cluster
When you start a new cluster, elasticluster will:
- create the requested/configured number of virtual machines.
- wait until all the virtual machines are started.
- wait until elasticluster is able to connect to all the virtual machines using ssh.
- run ansible on all the virtual machines (unless --no-setup option is given).
This process can take several minutes, depending on the load of the cloud, the configuration of the cluster and your connection speed. Elasticluster usually print very few information on what’s happening, if you run it with -v it will display a more verbose output (including output of ansible command) to help you understanding what is actually happening.
~ $ elasticluster \
  --storage /home/alex/.evorepo/storage \
  --config /home/alex/.evorepo/azure.config \
  start evorepo
Starting cluster `evorepo` with 1 compute nodes.
Starting cluster `evorepo` with 1 frontend nodes.
(this may take a while...)
Configuring the cluster.
(this too may take a while...)
Your cluster is ready!

Cluster name:     evorepo
Cluster template: evorepo
Default ssh to node: frontend001
- compute nodes: 1
- frontend nodes: 1

To login on the frontend node, run the command:

    elasticluster ssh evorepo

To upload or download files to the cluster, use the command:

    elasticluster sftp evorepo
III.2. Setup the cluster
The setup command will run ansible on the desired cluster once again. It is usually needed only when you customize and update your playbooks, in order to re-configure the cluster, since the start command already run ansible when all the machines are started.
~ $ elasticluster \
  --storage /home/alex/.evorepo/storage \
  --config /home/alex/.evorepo/azure.config \
  setup evorepo
Configuring cluster `evorepo`...
 _________________________
< PLAY [Collecting facts] >
 -------------------------
        \   ^__^
         \  (oo)\_______
            (__)\       )\/\
                ||----w |
                ||     ||


 _________________
< GATHERING FACTS >
 -----------------
        \   ^__^
         \  (oo)\_______
            (__)\       )\/\
                ||----w |
                ||     ||


ok: [frontend001]
ok: [compute001]
 ________________________________
< TASK: group_by key="$gc3group" >
 --------------------------------
        \   ^__^
         \  (oo)\_______
            (__)\       )\/\
                ||----w |
                ||     ||


changed: [frontend001]
 ____________________________
< PLAY [GC3 master playbook] >
 ----------------------------
        \   ^__^
         \  (oo)\_______
            (__)\       )\/\
                ||----w |
                ||     ||


skipping: no hosts matched
 _____________________
< PLAY [Common setup] >
 ---------------------
        \   ^__^
         \  (oo)\_______
            (__)\       )\/\
                ||----w |
                ||     ||


 _________________
< GATHERING FACTS >
 -----------------
        \   ^__^
         \  (oo)\_______
            (__)\       )\/\
                ||----w |
                ||     ||


ok: [frontend001]
ok: [compute001]
 ____________________________________________
< TASK: Ensure that package cache is updated >
 --------------------------------------------
        \   ^__^
         \  (oo)\_______
            (__)\       )\/\
                ||----w |
                ||     ||


changed: [frontend001]
changed: [compute001]

# ...
III.3. Destroy the cluster
The stop command will terminate all the instances running and delete all information related to the cluster saved on the local disk.
WARNING: elasticluster doesn’t do any kind of test to check if the cluster is used!
~ $ elasticluster \
  --storage /home/alex/.evorepo/storage \
  --config /home/alex/.evorepo/azure.config \
  stop evorepo
Do you want really want to stop cluster evorepo? [yN] Y
Destroying cluster `evorepo`
INFO:gc3.elasticluster:shutting down instance `evorepo_vm0000_evorepo-compute001`
INFO:gc3.elasticluster:shutting down instance `evorepo_vm0001_evorepo-compute002`
III.4. Connect to cluster
After a cluster is started, the easiest way to login on it is by using the ssh command. This command will run the ssh command with the correct options to connect to the cluster using the configured values for user and ssh key to use.
If no ssh_to option is specified in the configuration file, the ssh command will connect to the first host belonging to the type which comes first in alphabetic order, otherwise it will connect to the first host of the group specified by the ssh_to option of the cluster section.
~ $ elasticluster \
  --storage /home/alex/.evorepo/storage \
  --config /home/alex/.evorepo/azure.config \
  ssh evorepo
Welcome to Ubuntu 14.04.3 LTS (GNU/Linux 3.13.0-68-generic x86_64)

 * Documentation:  https://help.ubuntu.com/

  System information as of Mon Nov 23 14:55:35 UTC 2015

  System load:  0.49               Processes:              244
  Usage of /:   10.9% of 28.80GB   Users logged in:        0
  Memory usage: 16%                IP address for eth0:    XXX.XXX.XXX
  Swap usage:   0%                 IP address for docker0: 172.17.0.1

  Graph this data and manage this system at:
    https://landscape.canonical.com/

  Get cloud support with Ubuntu Advantage Cloud Guest:
    http://www.ubuntu.com/business/services/cloud


Last login: Mon Nov 23 14:55:24 2015 from 79.112.77.237

ubuntu@frontend001:~$ whoami
ubuntu

ubuntu@frontend001:~$ cd /encrypted/
ubuntu@frontend001:/encrypted$ ls
ubuntu@frontend001:/encrypted$ df -h
Filesystem      Size  Used Avail Use% Mounted on
/dev/sda1        29G  3.2G   25G  12% /
none            4.0K     0  4.0K   0% /sys/fs/cgroup
udev            827M  8.0K  827M   1% /dev
tmpfs           168M  412K  168M   1% /run
none            5.0M     0  5.0M   0% /run/lock
none            840M     0  840M   0% /run/shm
none            100M     0  100M   0% /run/user
/dev/sdb1        69G   52M   66G   1% /mnt

ubuntu@frontend001:/encrypted$ exit
logout